A Basic Stacked Form
Allowing the user to input data into your app is a big part of any app. This is done in Stacked by using the Stacked Forms functionality. The most important part of this functionality is that Stacked:
- generates all text controllers for you
- automatically syncs the value the user types with the ViewModel
- provides basic validation checks in the ViewModel
Let's create some basic form functionality.
Create the View
Create a TextReverse View using Stacked CLI by running the following command:
stacked create view textReverse
Forms in Stacked
Stacked uses a generator to create the code required to work with forms. To tell the framework which controllers to generate we add an annotation to the View class called FormView. This takes in a list of fields where you can name the controller. We'll call our TextController reverseInput:
import 'package:stacked/stacked_annotations.dart';
(fields: [
FormTextField(name: 'reverseInput'),
])
class TextReverseView extends StackedView<TextReverseViewModel> {
const TextReverseView({Key? key}) : super(key: key);
...
}
Now we can run the generate command to create our form code:
stacked generate
This will create a new file called text_reverse_view.form.dart. It contains a mixin with the same name as the class but with a $ prefix, $TextReverseView. This file contains all your TextEditingControllers, FocusNodes and functionality to automatically sync those with your ViewModel, we'll cover this in more detail later.
Automatic Text to ViewModel Synchronization
The next step is to let the View know that you want the text entered by the user to automatically sync to your ViewModel. To do this we have to do a few things:
- Import the generated form file
- Mixin the
$TextReverseView - Call the
syncFormWithViewModelfunction when theviewModelis ready
import 'text_reverse_view.form.dart'; // 1. Import the generated file
(fields: [
FormTextField(name: 'reverseInput'),
])
class TextReverseView extends StackedView<TextReverseViewModel>
with $TextReverseView { // 2. Mix in $TextReverseView Mixin
Widget builder(
BuildContext context,
TextReverseViewModel viewModel,
Widget? child,
) {
return Scaffold(
...
);
}
void onViewModelReady(TextReverseViewModel viewModel) {
syncFormWithViewModel(viewModel);
}
...
}
The last thing to do is to update the TextReverseViewModel to extend from the FormViewModel instead of the BaseViewModel.
class TextReverseViewModel extends FormViewModel {
  ...
}
Now the controllers can be used in any TextWidget that accepts a TextEditingController and the ViewModel will automatically be updated as that value changes.
Basic UI
Since this is not a "Flutter UI building" tutorial, I'll keep this short. What we want to create is the following UI:
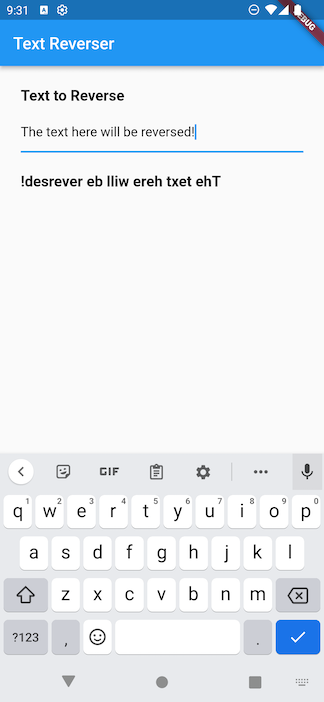
Now before you say anything, I know this is the most beautiful form UI you've ever seen. So please, if you want to give me compliments on the UI, join our Discord where we discuss lots of cool Stacked things. 😁
TextReverseView builder code
Replace your builder function in `text_reverse_view.dart` with the following.
Widget builder(
BuildContext context,
TextReverseViewModel viewModel,
Widget? child,
) {
return Scaffold(
appBar: AppBar(title: const Text('Text Reverser')),
body: Container(
padding: const EdgeInsets.only(left: 25.0, right: 25.0),
child: SingleChildScrollView(
child: Column(
crossAxisAlignment: CrossAxisAlignment.start,
children: [
verticalSpaceMedium,
const Text(
'Text to Reverse',
style: TextStyle(fontSize: 18, fontWeight: FontWeight.w700),
),
verticalSpaceSmall,
TextFormField(controller: reverseInputController),
if (viewModel.hasReverseInputValidationMessage) ...[
verticalSpaceTiny,
Text(
viewModel.reverseInputValidationMessage!,
style: const TextStyle(
color: Colors.red,
fontSize: 12,
fontWeight: FontWeight.w700,
),
),
],
verticalSpaceMedium,
Text(
viewModel.reversedText,
style: const TextStyle(
fontSize: 18,
fontWeight: FontWeight.w700,
),
),
],
),
),
),
);
}
The most important part of this UI is the fact that we don't have to create or manage our controllers and can simply write this:
TextFormField(controller: reverseInputController),
The rest of the form functionality will be handled by our previous setup. The last thing to do is to actually reverse the text. In the TextReverseViewModel we'll add a new dynamic property that will return the reversed text or a placeholder string if no text is entered:
import 'package:stacked/stacked.dart';
import 'text_reverse_view.form.dart';

class TextReverseViewModel extends FormViewModel {
  String get reversedText =>
    hasReverseInput ? reverseInputValue!.split('').reversed.join('') : '----';
}
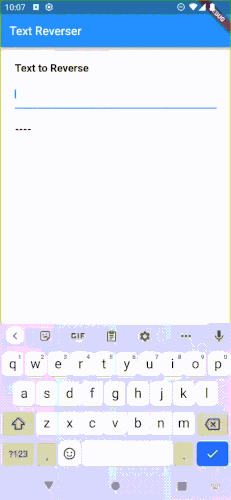
Run this code to make sure everything works. As you type into the form field you should be seeing the text below it display your input in reverse order.
Disposing of the Controllers
Since we don't create the controllers it's often forgotten that we should still dispose the controllers. This functionality is also generated for you. All that we have to do is override the dispose function in the View and call the disposeForm function provided by the generated form code. Add the following code in text_reverse_view.dart:
void onDispose(TextReverseViewModel viewModel) {
super.onDispose(viewModel);
disposeForm();
}
Form Validation
The last thing to tackle in the basics is form validation. The FormTextField class takes in a validator. This is a function that returns a nullable String and accepts a nullable String. The way we supply this, is in the form of a static function. This is a hard requirement from annotations but also forces us to organize our validators.
Open text_reverse_viewmodel.dart. Underneath the class, create a new class TextReverseValidators. Inside it, we will create a validator with the following rules:
- When we detect a number anywhere in the string we return
"No numbers allowed" - If no numbers are present we return
null
class TextReverseValidators {
  static String? validateReverseText(String? value) {
    if (value == null) {
      return null;
    }

    if (value.contains(RegExp(r'[0-9]'))) {
      return 'No numbers allowed';
    }
  }
}
To use this, we supply it as a validator to the FormTextField annotation:
(fields: [
FormTextField(
name: 'reverseInput',
validator: TextReverseValidators.validateReverseText,
),
])
...
Now we can run stacked generate, which will make use of this new validator. If you run your app and type in text with a number, you'll see it prints out a red validation message with what we return. It should look something like this:
The UI for the validation message is basic. It's text that displays only when hasReverseInputValidationMessage is true. This is a property that's also generated for you. This brings our Form Basics to an end. We are working on a deep dive of Stacked Forms that will be coming soon.
Using Form Viewmodel with Others like Future and Stream
The Form functionality is housed within a mixin called FormStateHelper. This means if you already have a ViewModel that extends from one of the special ViewModels like FutureViewModel or StreamViewModel you can simply mix that with the FormStateHelper. See example below.
// Original class that you want to add form functionality to
class ContentViewModel extends FutureViewModel<Posts> {
  ...
}

// Do instead
class ContentViewModel extends FutureViewModel<Posts> with FormStateHelper implements FormViewModel {
  ...
}
We're ready for the Web 🚀
Master Flutter on the web with the official Flutter Web Course